
System Requirements
Quad Core CPU
8 GB RAM
GPU:900mhz 1GB Memory
Quake Live is effectively Quake 3 with Clan Arena, Freeze Tag, Threewave CTF(Runes & Grapple hook) and InstaGib bundled. It has Steam support, which means adding mods, skins, maps, is a matter of subscribing to the content in the Steam Workshop.
It works over LAN & Internet and you may host your own games and use steam friends to invite, or announce your Quake Live server in discord gaming chat with the IP address.
The catch is, its $15 however keep an eye out when it goes on Steam special or add it to your Steam wishlist.

For those who already own Quake 3 on Steam, GoG or CD media, its quicker to use Quake Live. Otherwise there is ioQuake3 and Quake3e, but requires more messing around to host a server with a mapcycle and mods. It is NOT compatible with Quake Live. By the time you’ve worked out how to do all 3, it would of been quicker to use the GUI in Quake Live to host your LAN server on DadLAN day.
Installing
-
Purchase Quake live
Alternatively, you may purchase from Secondary Markets
Credit to bulletlottery -
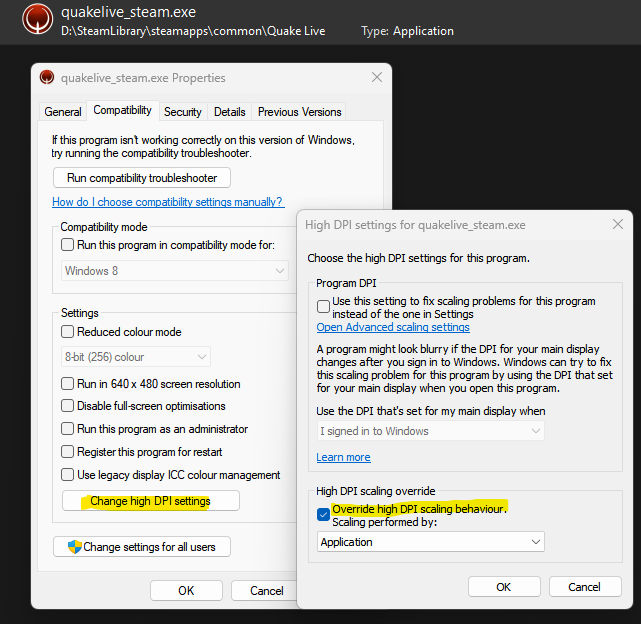
For Win10/11 users, change Scaling behaviour to application, by navigating to your Quake Live folder and locating Quakelive_steam.exe,
-
Right click Quakelive_steam.exe and select Compatibility, click Change High DPI Settings
-
Tick Override High DPI scaling behaviour to Application
-
Launch the game and configure your controls and resolution.
Tweaks
Credit to bulletlottery
Increase FPS
com_maxfps 250
Turns off the old cpu timing system
com_idlesleep 0
Known issues
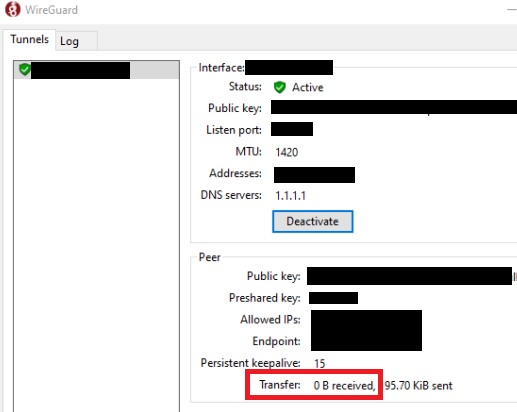
Can’t connect to a server hosted over WireGuard or DadLAN.
A server hosted over WireGuard or a server hosted on DadLAN day.
Solution: Refresh your Wireguard config Request a WireGuard Config
Then check if the Wireguard app transmitted anything after attempting to reconnect to the Quake Live server, If its still zero, log a Dadlan support ticket
Solution 2: Make sure the host is hosting in LAN mode
Host will need to do the following console commands
sv_servertype 1
map_restart
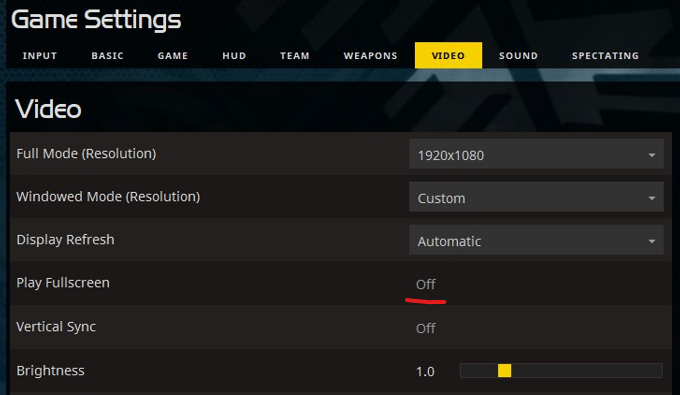
Graphical flickering state
After playing a match and exiting to the menu, the game goes into a graphical flickering state
Solution 1: Press Alt + Enter, then Alt + Enter again.
Solution 2: Quit the game via console(~), then type in quit
Launch Quake Live again
Goto game settings, then video
Set Play Fullscreen to off
Can’t join a game in progress
When I connect to a Quake server, I click join in the GUI, however nothing happens.
Solution: Disable steam cloud and delete your player profile folder
Quit Quake Live (if still running)
Goto Steam App > Library > Right Click Quake Live and select properties
Set Steam Cloud to off
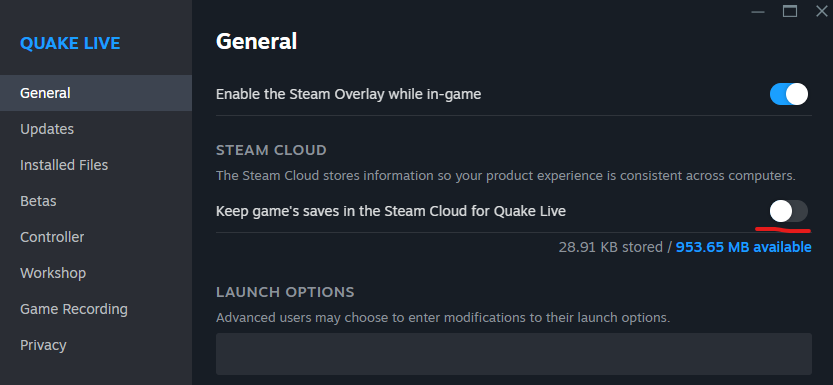
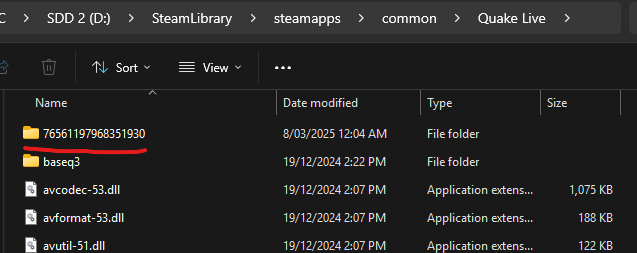
Then click into Installed Files > Browse
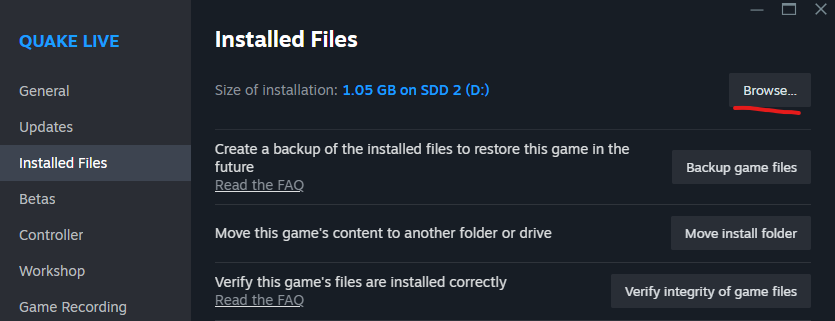
Delete the folder that are numbers only
Launch Quake Live, configure your controls and your player model again.
LAN self hosting
Note: The host must advise their IP address to allow players from other subnets to manually join.
- Get your LAN IP Address, Open Command prompt and type in ipconfig, you may have several but pay attention to the ethernet address for the DadLAN events. WireGuard will show up as unknown adapter.

- Launch Quake Live and click Start Match.
- Label the Match and set match type to LAN
- Configure Game Type, Arena(map), maximum players, minimum players(bots) team size (if required) and launch the game.
- Announce your game in discord gaming chat or your subnet with your LAN IP Address for the DadLAN event otherwise your WireGuard IP address for remote/internet play.
LAN Players
- Get the IP Address from the host, should be in discord chat.
- Bring down the console by pressing ~, type in
connect x.x.x.x:27015where x is the IP Address of the host

Internet self hosting
This requires port forwarding from your router to your computer, login to your router and configure port forwarding 27960 UDP
- Launch Quake Live and click Start Match.
- Label the Match, set match type to Internet and set a match password.
- Configure Game Type, Arena(map), maximum players, minimum players(bots) team size (if required) and launch the game.
- Announce your game in discord gaming chat or your subnet with your Quake Live Server Name
- Use Steam friends to invite people to your server.
- When done hosting, disable the port forwarding up until the next time you host Quake Live.
Dedicated Server Hosting
Supports LAN or Internet with port forwarding (27960 UDP).
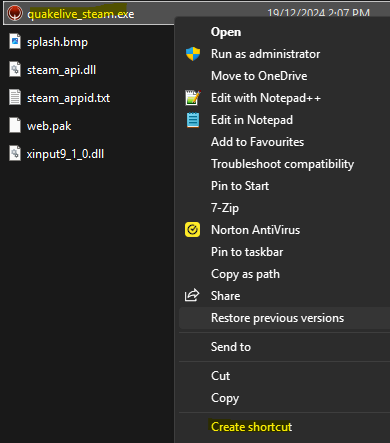
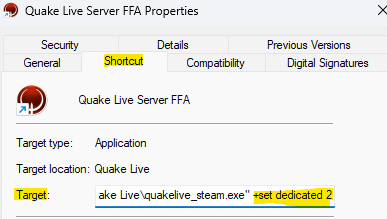
- Browse to the Quake Live Directory
2.Create a shortcut out ofQuakeLive_steam.exe
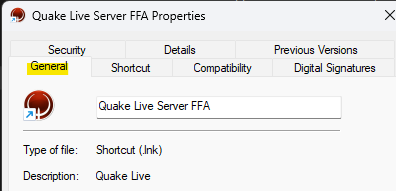
3.Label the shortcut in the general tab
4.Click into the Shortcut tab and add the parameter
+set dedicated 2for internet hosting or
+set dedicated 1for LAN hosting
Then click ok. - Double click your shortcut to run the server, share the IP in chat if its a LAN server.
Alternate hosting article for windows, Steam Community :: Guide :: Dedicated Server for Windows (w/ SteamCMD)
For Linux, follow this article Steam-Community :: Guide :: Quake Live Linux Dedicated Server Install/Config
Example Config File
// Servers have the ability to run multiple gametypes, known as "factories." You should not add gameplay related
// cvars in the server config: they may get overwritten by the factory. For creating your own sets of gameplay rules,
// create a file ending in ".factories" inside baseq3/scripts, and refer to "Creating custom gametypes" in the
// server_readme.txt file.

// Be aware that factories can override any cvar, including ones specified in this config file.

set sv_hostname "M1khail's Quake Live pw in discord"
set sv_tags "dadlan" // Comma delimited field of server tags to show in server browser.
               // Will automatically include gametype and some gameplay modifications.
               // ex. "crouch slide, classic, space"
set sv_mapPoolFile "mappool.txt"  // Map pool that the server will use. See default mapcycle.txt for format.
                                  // Built in map pools: mappool.txt, mappool_ca.txt, mappool_ctf.txt, mappool_duel.txt,
                                  //                     mappool_ffa.txt, mappool_race.txt, mappool_tdm.txt
set g_accessFile "access.txt"      // Used to determine which 64-bit Steam IDs have admin access, or are banned.

set sv_maxClients "16"     // How many players can connect at once.
set g_password "dadlan"          // Set a server-wide password, and stop all users from connecting without it.
set sv_privateClients "0"  // Reserve slots that can be used with sv_privatePassword.
set sv_privatePassword ""  // Password to use in conjunction with sv_privateClients.
set com_hunkMegs "80"      // May need to be increased for additional players.

// Flood protection will increment everytime the user sends a client command, ex. dropweapon, changing name, color
// model, or chatting. Set g_floodprot_maxcount to 0 to disable completely, but this will allow uncontrolled spam.
set sv_floodprotect "10"       // Kick the player when they reach x commands, decreases by 1 every second
set g_floodprot_maxcount "10"  // Kick the player when their userinfo flood counter reaches this level.
set g_floodprot_decay "1000"   // Decrease the userinfo flood counter by 1 this often, in milliseconds.

// Add the below values for which callvotes should be DISABLED:
// map              1
// map_restart      2
// nextmap          4
// gametype         8 (ex: "/callvote map campgrounds" will be allowed, but "/callvote map campgrounds ca" will fail)
// kick             16
// timelimit        32
// fraglimit        64
// shuffle          128
// teamsize         256
// cointoss/random  512
// loadouts         1024
// end-game voting  2048
// ammo (global)    4096
// timers (item)    8192
set g_voteFlags "0"
set g_allowVote "1"        // Turn off all votes
set g_voteDelay "0"        // Delay allowing votes for x milliseconds after map load.
set g_voteLimit "0"        // Limit users to x votes per map.
set g_allowVoteMidGame "0" // Don't allow callvotes once the map has started
set g_allowSpecVote "0"    // Allow spectators to call votes

set sv_warmupReadyPercentage "0.33"  // Ratio of players that must be ready before the match starts.
set g_warmupDelay "10"               // Wait x seconds before allowing match to start to allow all players to connect.
set g_warmupReadyDelay "0"           // Force the game to start after x seconds after someone readies up.
set g_warmupReadyDelayAction "1"     // Set to 1 to force players to spectator after g_warmupReady Delay, 2 to force ready up.

set g_inactivity "0"  // Kick players who are inactive for x amount of seconds.
set g_alltalk "0"     // 0: Limit voice comms to teams during match
                      // 1: Allow all players to talk to each other always
                      // 2: 1+ send back your own voice to yourself for testing

// System settings

// Uncomment and set below to use (server.cfg will override commandline!)
// set net_strict "1"    // Quit out immediately if we can't bind the IP and port.
// set net_ip ""         // Which IP to bind to. Blank will bind to all interfaces.
// set net_port "27960"  // Which UDP port to bind to. Blank will start at 27960 and keep going up, if net_strict is 0.
set sv_serverType "2"    // 0 = Offline, 1 = LAN, 2 = Internet
set sv_master "1"        // Whether the server should respond to queries. Disable this to stop server from appearing in browser.
                         // (This will affect the LAN browser!)

set sv_fps "40" // Change how many frames the server runs per second. WARNING: Has not been tested extensively, and
                // will have a direct impact on CPU and network usage!
set sv_pure 0
// Exit the server if idle (not running a map) for a specified time. This will allow it to automatically restart
// in the case of a game error or other problem. A value of "1" is recommended, but not default, when you are running
// the server detached from the terminal.

set sv_idleExit "120"

// Enable remote console, provided through ZeroMQ. See zmq_rcon.py for simple client.
// ZMQ rcon binds on a separate port from the game server, and uses TCP. It must differ from the stats port if used.
// Rcon can not be enabled or disabled after launch, nor can the IP and port change. Password can, however.


// Uncomment and set below to use (server.cfg will override commandline!)
set zmq_rcon_enable "1"
// set zmq_rcon_ip ""
set zmq_rcon_port "28960"
set zmq_rcon_password "changeyourpassword"

// Enable ZeroMQ stats socket. This will not be much use without a client listening.
// See zmq_stats_verbose.py for example connect and stats printing.
// If not specified, the stats socket will default to the same IP and port as the game server, but on TCP.

// Uncomment and set below to use (server.cfg will override commandline!)
// set zmq_stats_enable "1"
// set zmq_stats_ip ""
// set zmq_stats_port ""
// set zmq_stats_password ""

// Set Bot & Game settings
set bot_nochat 1
set bot_startingskill 4
set bot_minplayers 8
set g_weaponspawn 0
set capturelimit 5
set fraglimit 30
set roundlimit 5
set scorelimit 50

// The server will run serverstartup when it finishes initializing, so start a random map from the map pool.
//set serverstartup "startRandomMap"
// Or, start a map of your choosing (factory is required)
set serverstartup "map longestyard ffa"
Remote RCON App
Once you’ve defined the rcon settings in the server.cfg file, you may connect using the community rcon app
// Uncomment and set below to use (server.cfg will override commandline!)
set zmq_rcon_enable "1"
// set zmq_rcon_ip ""
set zmq_rcon_port "28960"
set zmq_rcon_password "changeyourpassword"
Adding admins
This requires to know the persons steamid and requires the file access.txt to list the admins, the server must be OFFLINE to make changes, otherwise the setting won’t stick.
- Browse to the Quake Live folder
- Goto
baseq3folder - open
access.txtfile and follow the instructions inside the txt file to add the steamid and admin status.
Admin Console Commands
Bring down the console by pressing ~
Change the map
map <mapname> <mode>
you can use the dir command to list the map names
dir maps bsp
Valid modes
actf- Three wave CTF (Runes & Grapple hook)ctf- vanilla CTFft- Freeze Tagtdm- Team Deathmatchca- Clan Arenadom- Dominationiffa- InstaGib FFAictf- InstagGib CTFift- InstaGib Freeze Tag
Note: Some modes doesn’t have bot support, such as domination
Two map commands example
map solid ffa
map basesiege ctf
Restart a match
map_restart
Backfill empty slots with bots
If you want bots on the server to be replaced by players when they join use
bot_minplayers <number>
Example
bot_minplayers 8
Set starting skill of bots
bot_startingskill <number>
Example
bot_startingskill 4
Valid numbers are 1 to 5, higher is harder.
Disable bots from chatting
Will stop bots, stopping mid game to chat
bot_nochat 1
Specify a password before joining a server
This is for players trying to join a password protected server
password <password>
Example
Password dadlan
Set a server password
Sets a server password, good for arranged wars or pick up games
g_password <yourpassword>
Example
g_password dadlan
Quick weapon respawns
Weapons will respawn quicker, which is the closest thing to weapon stay
g_weaponspawn 0
Set Captured flag limit
capturelimit <number>
Example
capturelimit 5
Set Frags to win the match
fraglimit <number>
Example
fraglimit 30
Rounds to play in Freeze Tag and Clan Arena
roundlimit <number>
Example
roundlimit 7
Set Score limit for domination
scorelimit <number>
Example
scorelimit 75
Add a bot
addbot <validbotname> <skilllevel> <team>
Example - this command adds a bot at hardcore skill level to team red
addbot doom 4 red
Valid names
- Doom
- Major
- Grunt
- Sarge
- Orbb
- Crash
- Visor
- Hunter
- Lucy
- Klesk
- Slash
- Crash
- Bitterman
Kick a player or bot
kick <playername>
Example
kick Sarge